Guardian Inspection Payments

Home Inspection Payment Processing

Call Today

Inspection Support Network

Inspection Support Network™(ISN) launched in 2002. In 2003 Guardian and ISN began working together, supporting commercial and residential inspectors with their payment processing. The inspection industry is evolving rapidly and the ISN’s development team continues to deliver countless updates and new features to support inspectors. At the same time, Guardian is focused on actively automating and simplifying every task around payments. The Inspection Support Network is actively used by small, medium and large inspection companies. Guardian and ISN have worked together, to provide an extremely competitive pricing model with no monthly fees, no minimum requirements and no contract or cancellation fees. Allowing all size Inspection companies to take advantage of integrated credit card processing within ISN.

Sign Up Now - ISN US Accounts

Please submit the information below and someone will be in touch with you shortly.

For ISN Canada - please click below

Our partner Clover Connect handles the processing of Canadian applications. Please click the button below to begin the application process by submitting a few basic details.

Pricing

Rates & Fees

Transactions

Monthly

Setup

Simple

Just 3 Simple Steps...

  1. Call Guardian Financial. Our representatives have been working with the Home Inspection Industry for over 17 years. They will answer all your questions and send you the application documents you need.
  2. Fill out the simple online application which takes less than 10 min. We will have your account set up and active within 2 business days.
  3. Link your new Guardian Financial merchant account to the ISN Software by simply inserting your cardpointe gateway account numbers into the Inspection Support Network Software.

It really is as easy as 1,2,3.

Compatible

Because our merchant account is completely compatible with Inspection Support Network Software you will have the ability to accept all card types right inside your ISN software.

Features

Using/Setting Up Convenience Fees

Note: Prior to enabling the Convenience Fee System:

  1. If you haven’t already, create a specific Fee in your ISN to apply the Convenience Fee charge your Surcharge Fee at Settings — Office Settings — Inspection and Fee Settings — Fees.
    Additional information regarding creating fees is available here.
  2. Then activate the convenience fee feature under Settings — Office Settings — My Office Settings — Convenience Fee.

In the modal that pops up, be sure to read the legal disclosures regarding surcharges carefully.
Then check the box labeled Use the Convenience Fee System.
You’ll get a new set of options for which fee you apply the convenience fee to.

Then enter the percentage, or fixed amount, of your convenience fee in the Surcharge box.


NOTE: when entering a fixed amount, enter numeric values only. You’ll want to avoid entering an additional dollar sign in the text field where the fixed fee is entered. This will cause the convenience fee to populate properly when a client/agents goes to make payment.

Select the fee you’ll be applying the surcharge to.


NOTE: this fee should ONLY hold the convenience fee, do not select a fee where you apply other costs.

You then have the option to include a custom message describing your convenience fee to your clients, or you can leave the message field blank to allow the system to display the default message.


Save your changes, and you’re done!

Mobile App

Payment can be added to an order from the ISN mobile app, and the following directions will walk you through the process.

Don’t have the Mobile ISN? You can get more information on that here.

Within your ISN Mobile app, navigate to the order and click on the blue info icon:
Once you click on that blue info icon, scroll down the page until you see Add Payment, and then follow the prompts.
Click on the Method of payment the client would like to use
If it is a check click on “Use Amount Due” and Enter the Check no.
If it is a Credit Card… and you are using an Android phone… click use amount due and then either type in the CC # or Scan the card to read the number off the card and auto fill for you. (This doesn’t take a picture of the card)
If you are using an iPhone…. click on use amount due and then either type in the CC # or click “Scan Credit Card”

When you are done entering payment details hit “Add Payment”.

Inspection Support Network has a mobile version of our website that can be a tremendous tool for inspectors. Sign agreements, view client, agent and access info and even take payments all from the field!

To Begin, send yourself the link. Go to Tools — Send my Mobile Device the ISN Link or click on the Send Me The Link button on the bottom right of your ISN in the footer.

As you can see your ISN Mobile “App” will allow you to do many helpful tasks from the field. Whether you need to navigate to your next inspection via google maps, have your client sign their agreement or even send The Real Estate Dashboard link, your team at ISN has made it easy for you to be connected and get business done!

***ISN Mobile is a mobile version of your ISN. It is not a true “App” and therefore can be updated quickly! – It will not be found in Apple’s market or Google Play.

Report Lock

This article will walk you through how you can prevent access to reports.

Navigate to Settings — Office Settings — Interacting with my Clients and agents — Report Delivery Options
Here is where you select the options that will force inspections to be paid and signed for before being viewed.

Now clients and agents cannot access your report without a client signature nor payment. This will prevent access to your report without the signature and payment.

Note: This setting is on by default, so changing this is uncommon. Please be sure to hit Save Settings after making adjustments!

Adding Payment Links

If you accept credit cards for payment of your inspections and use one of the processors that ISN integrates with, you can allow your clients to make their payment online.

This simple and easy feature can be used by adding a payment link replacement value into an email template.
You can use one of the email templates provided in the ISN library or create your own entirely.

Simply place your cursor in the desired location within the email template the payment link is to appear, and from the drop down menu of replacement values, click on: Pay For Inspection Link. Click here for more information on editing email templates.

%paymentlink% is a replacement value that when used generates some stock wording in a hyperlink that cannot be adjusted that says “pay online” %paymenturl% generates an actual link, so if you have specific wording you want to use you can type those words out, select them, and click the little ‘link’ icon in your template editor to add %paymenturl% into the words:

Once completed, we suggest that you review the newly created/edited email template to ensure that it is working 100% to your satisfaction. To review the email template, proceed to the Email Template grid (Email — My Email Templates) and click on the View Template icon to left on the grid (dark circle with the white ‘i’).

This quick, easy, and very secure feature provides the convenience and privacy your clients seek for payment processing.

The ISN will process this payment and automatically mark this inspection as paid! Another great feature and communication tool at your fingertips!

Send Payment Request

A commonly encountered need during the life cycle of an inspection is when your clients and agents ask for an add-on service after payment has been made for the primary services. Collecting payment for additional charges is easier and faster with the Send Payment Request feature of the ISN.

To utilize this feature, you must:

  1. Have an active Payment Processor selected in the ISN Payment Settings
  2. Have the View Inspection Payment Information privilege active in your user account

Sending a payment request will send an email, using a template of your choice (you can also use our pre-written template), to the recipient payor of your choice. You enter the amount, optionally select the services this is for, and optionally provide notes for the recipient to see when go to pay. The email will contain a link in it which, when clicked, will take the recipient to the payment form.

To start sending payment requests, just use the “Send Payment Request” option in the “Actions” dropdown for an order:

The request form has several areas that require input:

  1. Template – this is the email template the recipient will receive
  2. Amount – use the amount due, total fee, or a custom amount
  3. Payor/Recipient – use the Client, Agent, Insurance Agent, or other contacts on the order
  4. Services/What For – check the services being paid for, or omit them and provide payment notes

You can choose to use ISN’s default language or select any email template from your system to send.

Whichever you choose, you’ll see a preview to the right

In this example, I’m going to charge the seller’s agent $150 for the termite portion of my order.

Click Send and you’re all set. They will receive the email with a link to pay for your specified amount. Below is an example of the email they will receive when using ISN’s default language.

When the payment link is clicked, here is an example of the payment screen they will be directed to.

You can also track within an order if a payment request was ever sent, for how much and who it was sent to. Just view your order and look under your “Inspection Order Notes”.

When the Payment Request is received & subsequently paid the payor will receive an emailed receipt confirming their payment.

Payment Request Email Template Replacement Values

If you are creating your own template to send for a payment request, please review this list of replacement values(RVs) that you can use within your Payment Request email template:
%payment-request-amount%
%payment-request-amount-formatted%
%payment-request-payor-name%
%payment-request-payor-email%
%payment-request-notes%
%payment-request-payment-date%
%payment-request-services%
%payment-request-url%
%payment-request-link%

INSTRUCTIONS FOR INTEGRATION

Once you have your cardpointe gateway credentials, you will need to copy and paste them into ISN. To do this you will need to go to the “Settings” tab, then click on “Office Settings,” and then “Payment Options.”
Scroll down until you see the Guardian Financial Logo and click on it. This is the screen where you will paste the Merchant ID#, Username and Password. Also, here, you can select which card logos you want to have show up on your invoices and contracts. The rest of the settings are set to the default settings. Our recommendation is that you don’t change any of them. If you have questions on any of the settings, please feel free to contact us.
Once that is complete, the last step is go to into your ISN Email Events and turn off the setting for, “Client Verification of Inspection With Agreement,” and turn on the setting for “Client Verification of Inspection with Agreement and Credit Card Payment Link.”

FAQ's

We have ensured that Guardian will match or beat your current rates. With Guardian, there are no monthly fees whatsoever (if you don’t use it, it won’t cost you a dime). There are also no startup fees, and it is a month to month contract with no cancellation fee.

Guardian has an online application that only takes a few minutes to fill out. There is no documentation to sign, scan, or email. You can do everything electronically. Your account is generally ready within one business day. From start to finish, this process should not take more than 10 minutes–plus you’ll be saving money every month.

No. The transition to Guardian is totally seamless. Once you enter your updated credentials in ISN, you are all set up. Any payment links still floating out there will still work, they will just be pointed to the new account.

 Guardian offers next day funding. Any transactions completed before 7:45pm EST will be automatically deposited into your account the next business day.

Unlike many processors, Guardian doesn’t take out their fees until the next month. So, if you do a $400 home inspection, then $400 will show up in your account. This makes reconciliation and transaction tracking much simpler.

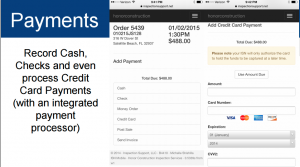
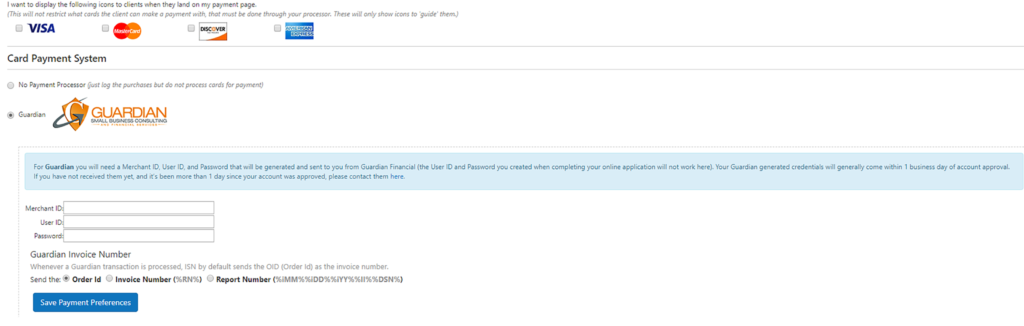
 ISN has been working with Guardian for over a decade. They guarantee lower processing fees, no monthly fees, no setup fees, and no cancellation fees. In addition, they offer next day funding, have better reporting and integration with ISN, and have best in class customer service. Guardian understands our industry, your business, and most importantly, your ISN software. They provide top-notch customer service (they actually answer the phone) and, because of their relationship with the inspection industry, they have a vested interest in making sure you are satisfied with your account and their service.

Talk to Guardian. They will take a look at your account, your rates, and fees and let you know what they can do. Just call them at 800-608-7363 and they will help you out.

ISN has negotiated with Guardian Financial to offer inspectors a no-monthly-fee payment processing account. If you don’t use it, you don’t pay a dime. Even if you aren’t using payment processing often, we recommend setting up an account so that it’s ready when you need it.

Guardian will match or beat whatever you are currently paying. Just send them a copy of your processing statement, and they will work up a proposal for you and show you how much you save by making the switch. If they can’t save you money, they will give you $500 (they have never had to pay it out).

Unless you request that we not set up a specific card type, your account will be set up so that you can accept all card types. Our recommendation is that you accept all types of credit cards. We recommend that you allow your customers to pay with their preferred form of payment, no matter what it is.

You will log into your cardpointe account, (www.cardpointe.com) with the same username and password that you created when you did the online application. Then go to the reporting tab, then statements.

You will need to click on the Non-Compliant link and go through the PCI questionnaire. This needs to be done annually. At Guardian, we do not charge an annual PCI compliance fee, nor do we charge a non-compliant fee. Click here to link to instruction page on our site.

If you chose to use the authorization method your customers card will only be authorized for the amount of the inspection (like when you check in at a hotel) then the transaction will be finalized at a later time that you specify in the software. Usually at the time of the inspection.

If your customer enters their email address in the payment process, they will get an email receipt with all the details of the transaction.

The best way to process a refund, is to do it within your inspection software by going to the inspection detail and choosing refund. You can also process a refund in the cardpointe gateway. When you log into your cardpointe account and go to the reporting tab, the default view is of the past 7 days transactions. The transaction number is a hyperlink that when clicked will show you all of the details of the transaction and have an option to refund available.